


Pacific Tundra
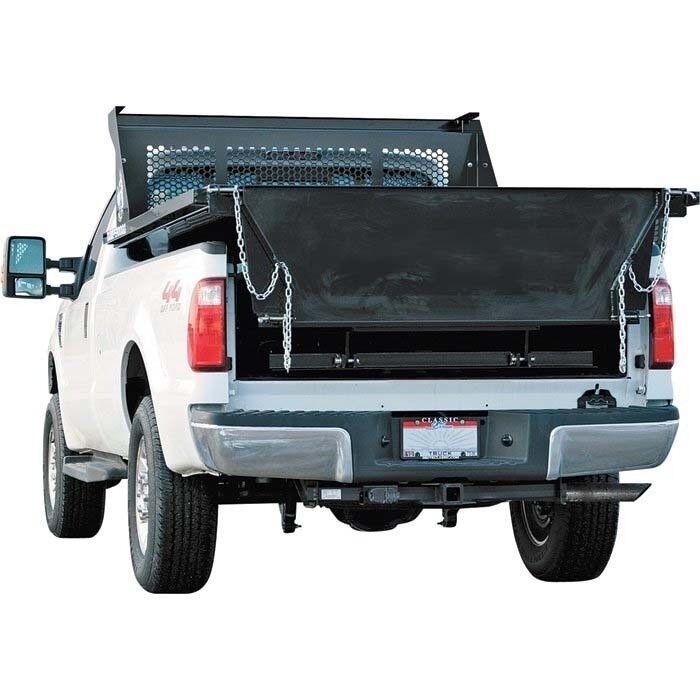
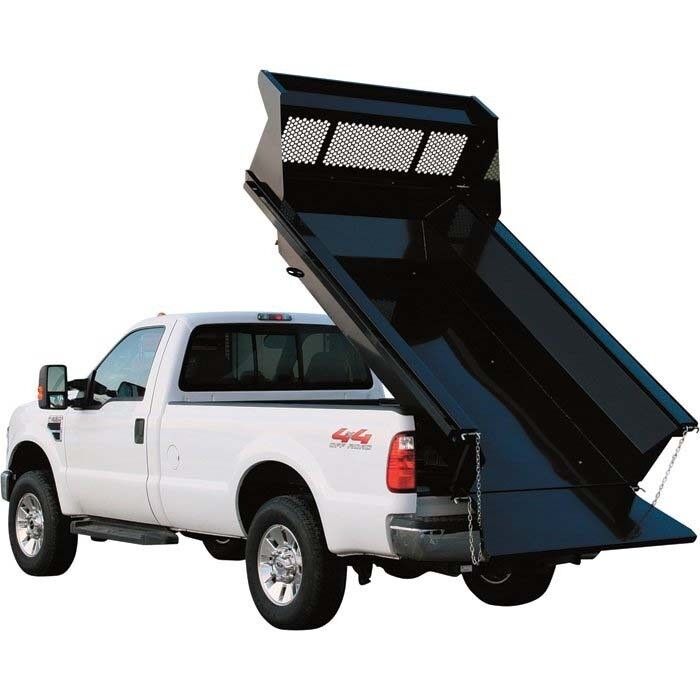
Steel DUMP BED INSERT KIT for 6 ft Beds - 3 Tons / 6000 lbs Cap - Incl Hardware
Steel DUMP BED INSERT KIT for 6 ft Beds - 3 Tons / 6000 lbs Cap - Incl Hardware
Couldn't load pickup availability
Free Shipping within the Lower 48 United States. If you are located outside of the Lower 48 United States, please request a freight quote.
Model Number: PTT9F985418
Condition: New
Description: Steel DUMP BED INSERT KIT for 6 ft Beds - 3 Tons / 6000 lbs Cap - Incl Hardware
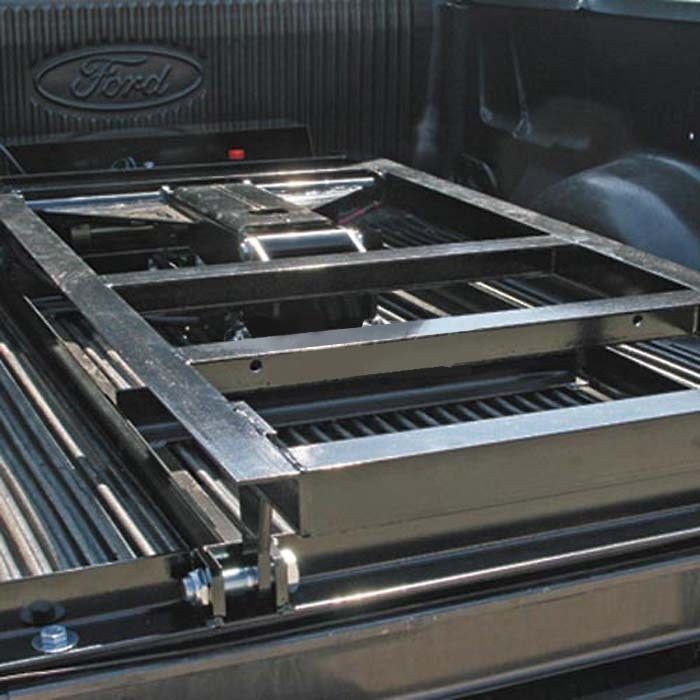
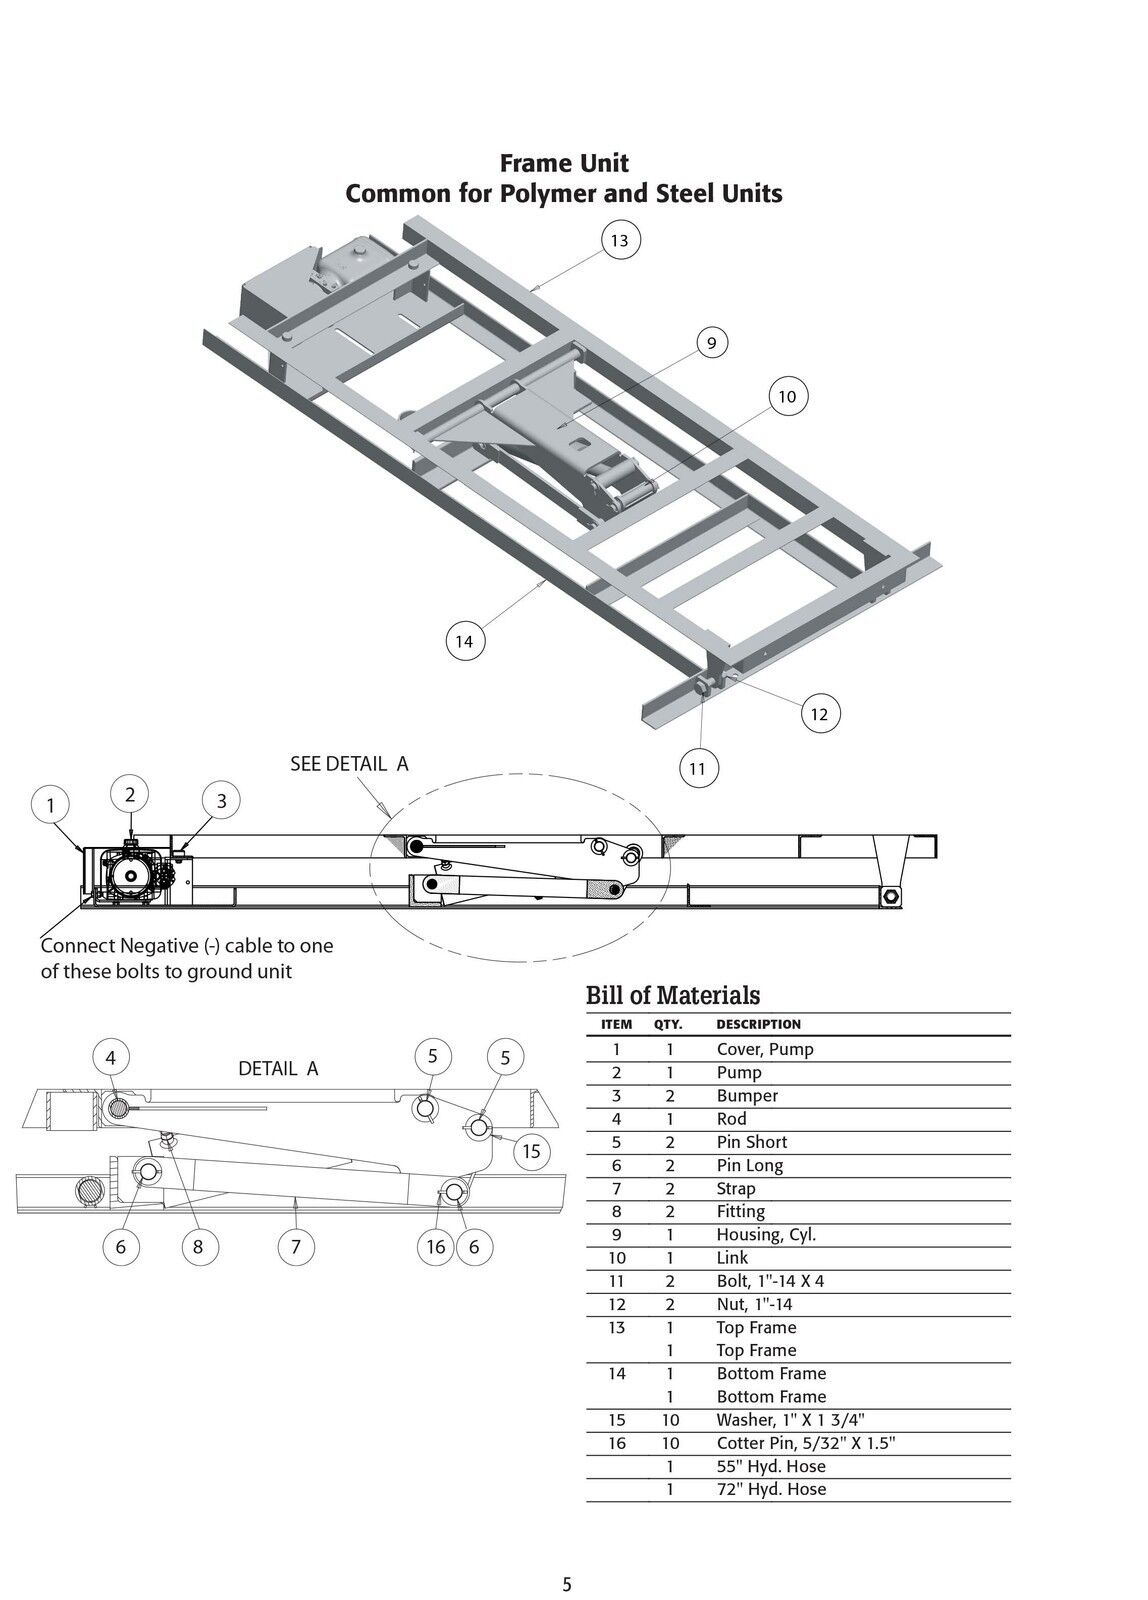
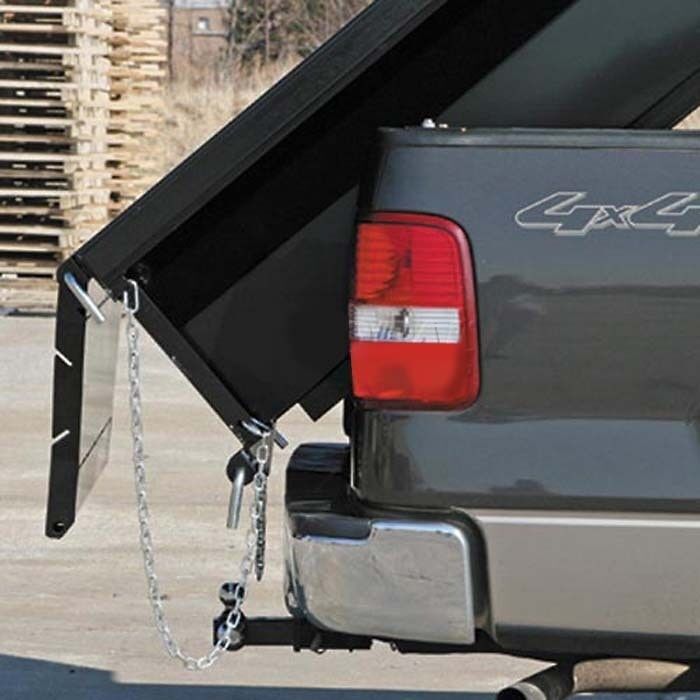
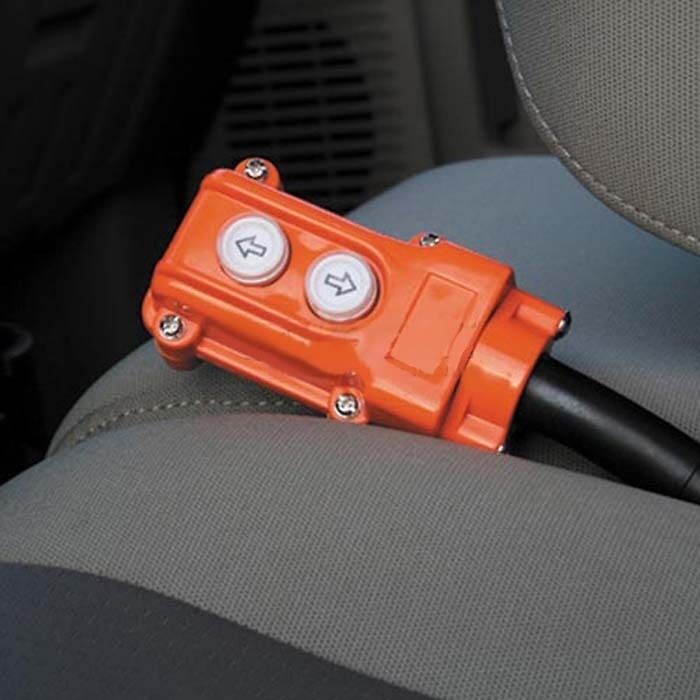
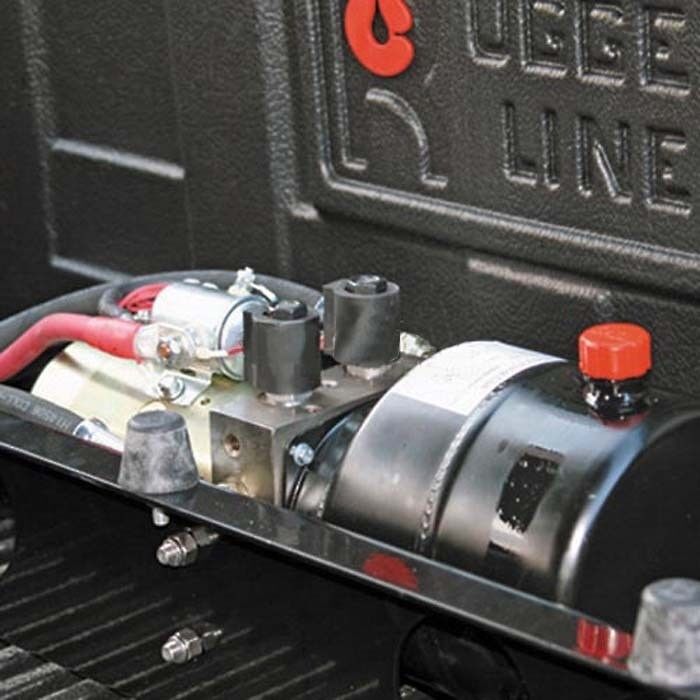
Features: Fits most 8 ft truck beds - Frame and insert are constructed of commercial-duty 12 gauge steel - Double pivoting removable steel tailgate - 6,000 lbs (3 ton) weight capacity - 1.5 cubic yard capacity - 3 HP electric motor - Hydraulic pump - 45* angle bed tilt - Powder coat finish - Comes standard with a manual safety bar, 20 ft battery power cables, tethered control box with a 9ft cord, and body up indicator kit.
See similar items in our eBay Store
Optional: Cab Guard (Shown in Photos - Not Included) - Please Inquire
Optional: Wall Extension Bracket Kit (Not Included) - Please Inquire
Optional: Tarp Kit (Not Included) - Please Inquire
Please Note: Weight limits not to exceed manufacturer's gross vehicle weight limits
Description & Specification:
Application: Fits most 6 ft beds
Includes: Manual safety bar, 20 ft battery power cables, tethered control box with 9 ft cord, and body up indicator kit
Load Capacity (lbs/ton): 6,000 lbs (3 tons)
Cubic Yard Capacity (cu. ft.): 1.5
Hydraulic Pump HP: 3
Hydraulic Pump kW: 1.5
Voltage: 12
Dump Angle: 0 to 45 degrees
Construction: Steel dump body & structural steel frame
Finish: Powdercoated
Product Dimensions (in): 82" x 72" x 26"
Item Weight (lbs): 830 lbs
Shipping Weight (lbs): 920 lbs
Installation Instructions:
For your reference, photos for the following installation instructions are included in the photo section
1. After receiving you dump body ensure that necessary components and hardware have been shipped and that unit is not damaged. See packing list for complete breakdown of component parts.
2. Before starting to install the dump body ensure that the vehicle is on flat level ground and vehicle brakes are applied and use wheel chocks for safety measures.
3. Remove tailgate from vehicle. Place tailgate in safe area so tailgate does not get damaged.
4. Check fluid level of pump unit. The unit should be filled approximately ½" from the top of the reservoir. Use only SAMTM or Dextron brand hydraulic fluid and do not over fill unit.
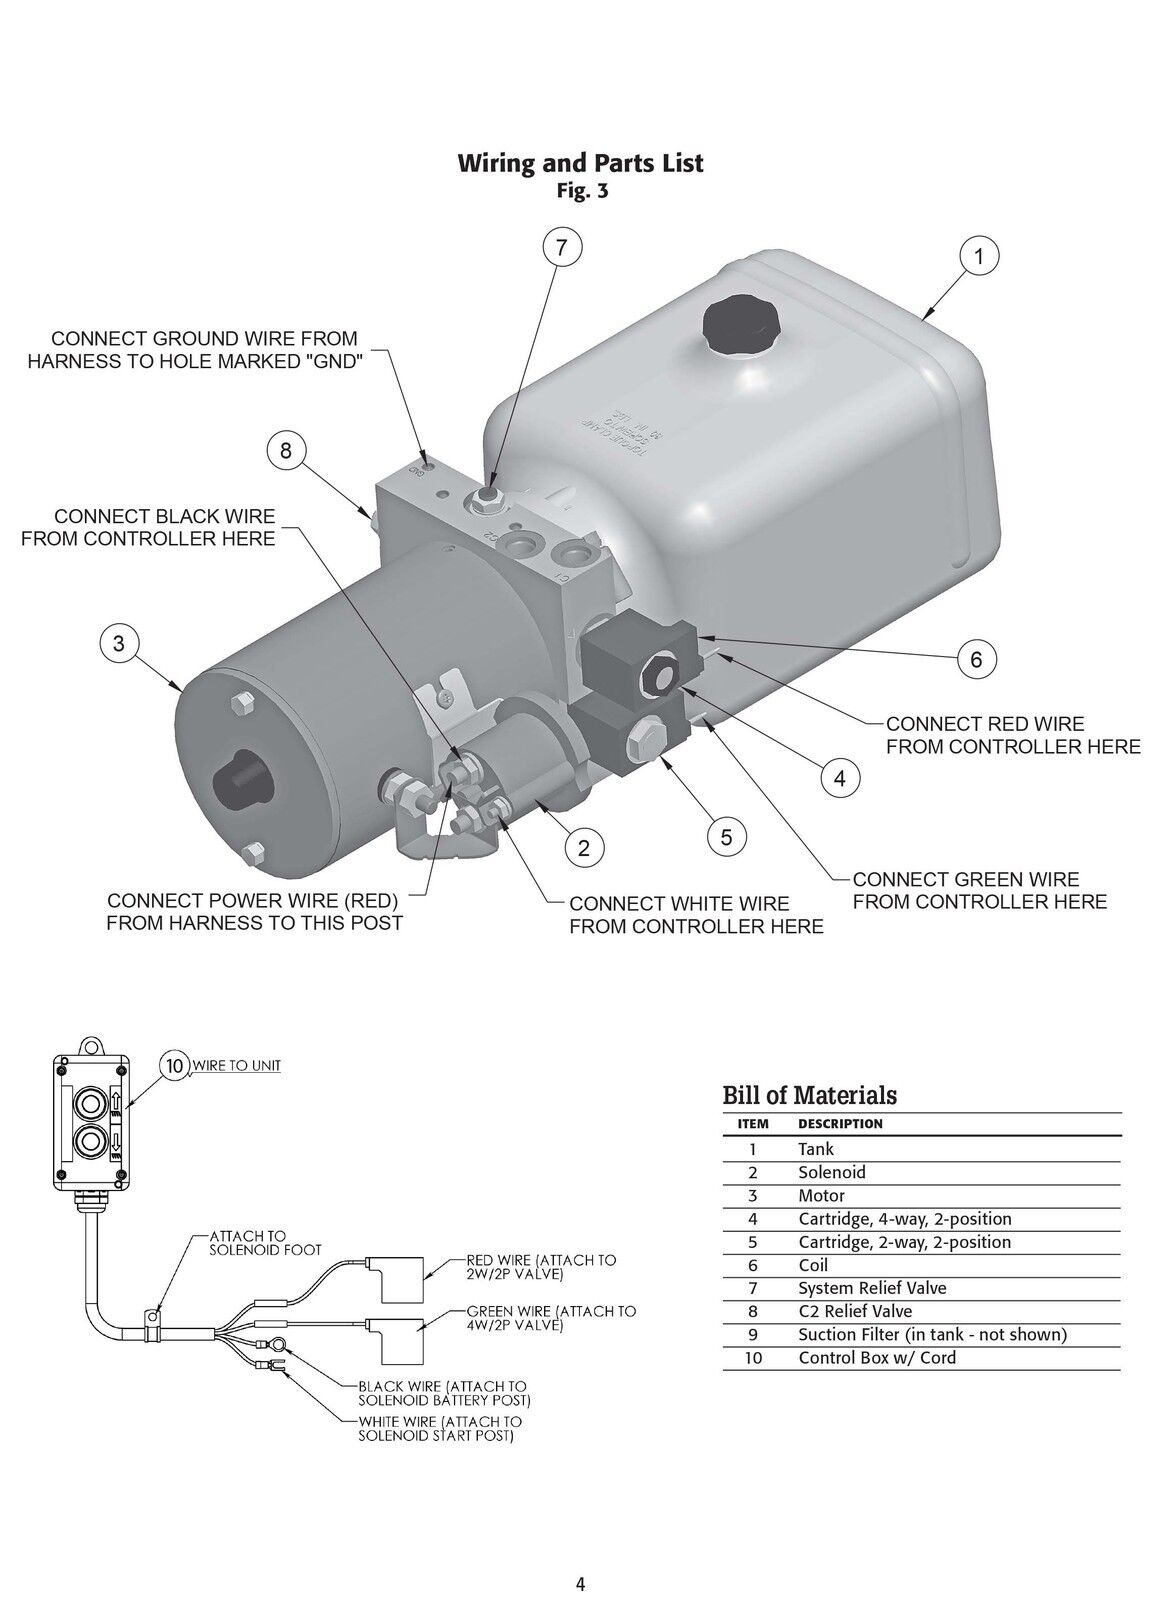
5. Connect battery cables to pump unit as shown on page 4. Do not connect cables to vehicle at this time.
6. Place insert into bed of truck insuring proper clearance is achieved. Ensure the rear rail of the insert sits inside the truck bed. Be sure the pump unit cover does not sit against the front bed wall.
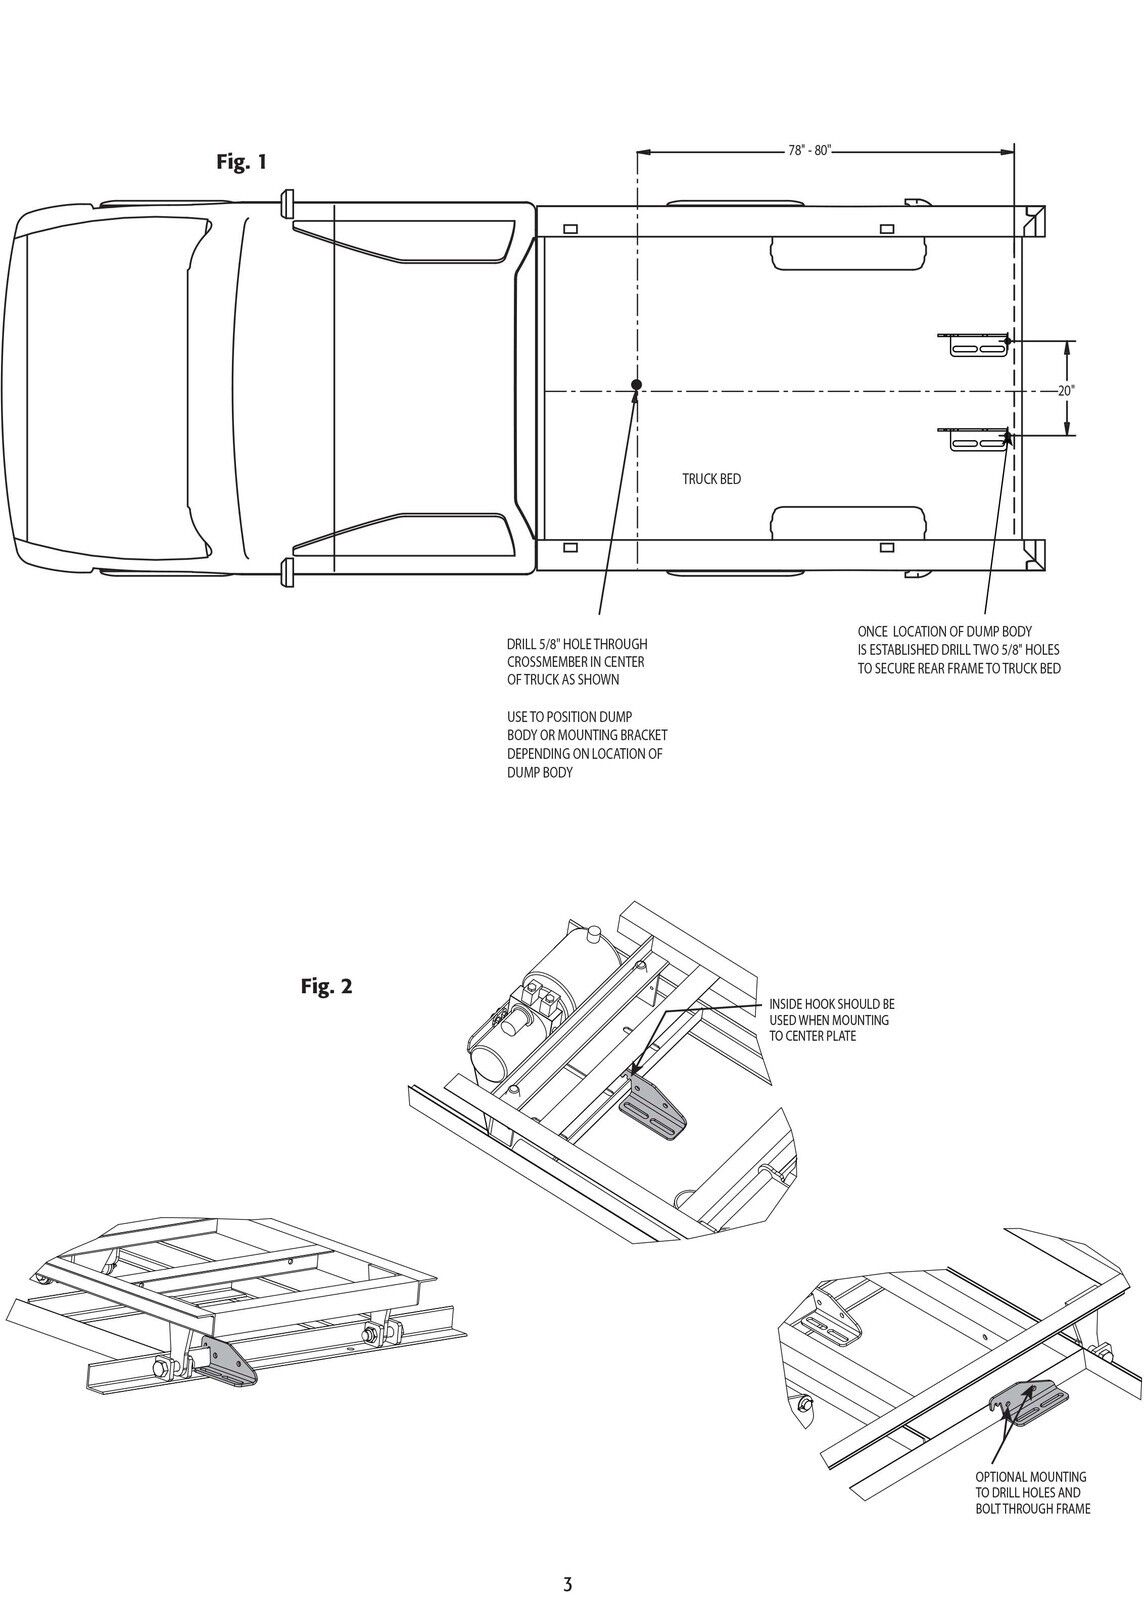
7. Follow Figure 1 (pg. 3) to locate the proper mounting locations. On an 8 foot bed there is a cross member located approximately 78"-80" inside the truck bed, it is easier to locate this cross member from the underside of the truck. On most trucks there is already a hole provided in the center of this cross member. Drill 5/8” through this existing hole into truck bed. This hole should align with the slot provide in the insert frame centered in the truck bed. Temporary power may be needed to raise dump bed to secure hardware. If bed is lifted use safety bar to prop bed in the up position. Once this hole is drilled and aligned with the frame use hardware to fasten along with steel backer plate to reinforce the attachment point. (Backer Plates not provided)
8. Locate the two holes located in the bottom of the insert frame at the tailgate area. Ensure there is clearance through the bed of the truck where these holes are located. If there are no wires and or obstructions, use holes as guides to drill through bed of truck. Again use proper hardware to secure dump unit to truck.
9. Also supplied in the kit are two u-bolts and brackets that can be used to fasten the units directly to the frame of the vehicle. The two brackets can be bolted any where along the bottom frame of the dump body. One hole for each bracket would need to be drilled. The u-bolt would then fit through the two holes in the bracket and the frame must also be drilled to accept the u-bolt.
10. Route and attach cables to battery and pump. Make sure cables are secure and away from exhaust and clear of any sharp edges, do not let cables dangle at any point, use zip ties to fasten in place. If you will run cables into cab of vehicle in sure grommets are use when routing through sheet metal. Never expose bare cables to truck frame or other metal surfaces. Keep cables clear of dump frame so they do not get pinched during operation. A good ground connection is needed to operate the Power Unit. Ensure that a good ground is achieved by connecting the negative (-) cable to the Power Unit mounting bolts (as shown on page 5) or threaded hole marked “GND” in the block of the Power Unit.
11. Mount hand control in cab. The hand control must be placed into cab of truck since it is not water proof. If the hand control is not placed inside the vehicle it will fail. Drill proper holes and again use grommets to protect cables from sheet metal.
12. The unit is now ready for operation. Perform another check on all fasteners and connections at this time. The unit should raise and lower.
Install Remote Control In Cab Of Truck
1. To install remote control in cab drill ¾” holes in truck bed and cab. Feed cable through drill holes along with proper grommets. Fasten cable ends to pump unit per diagram and secure. Seal all holes in cab with silicone to ensure water cannot enter cab. When not using remote control be sure to keep it away from vehicle pedals when driving. Place control on or behind seat.
Hydraulic Pump
1. Ensure the reservoir is filled before operation of the unit. Use only SAMTM or Dextron brand new hydraulic fluid in the unit.
2. Make sure all hose lines are connected properly and have no leaks in system.
3. If the power unit should stop operation inspect all connections both electrical and hydraulic.
4. Check for leaks and proper electrical ground of unit.
5. Check fluid level in reservoir.
6. Keep unit clean at all times.
7. Most common failures occur by loose connections in the electrical system and or dirt in the system. See Figure 3 (pg.4) for correct wiring.
8. A good ground connection is needed to operate the Power Unit. Ensure that a good ground is achieved by connecting the negative (-) cable to the Power Unit mounting bolts (as shown on page 5) or threaded hole marked “GND” in the block of the Power Unit
Warnings:
Do not load over 6,000 lbs.
Vehicle, dump insert and cargo must not exceed manufacturer’s gross vehicle weight rating.
Safety bar must be secured before servicing the dump unit. Do not place any part of your body under dump unit without safety bar being secured.
Do not attempt to secure safety bar or block dump body under loaded conditions.
Tailgate must be properly locked at all times.
During operation of dump insert keep all body parts clear of mechanical operating devices, structural supports and fastening systems. FAILURE TO ADHERE TO THE MANUFACTURER’S PUBLISHED WARNINGS COULD RESULT IN LOSS OF CONTROL, SEVERE PERSONAL INJURY OR DEATH.
When using the included Hook(s) to mount this unit to the truck you must be sure that they are properly secured and the units frame is unable to move in any direction. To accomplish this, you may need to use a fastener in each slot of the Hook(s) and/or install fasteners at the ends of the slots so that the Hook(s) and/or the unit cannot move after installation. Periodically verify that all mounting hardware is secured (checking before each use is recommended).